Oven Baked Chicken Tenders Recipe: Crispy, Juicy, and Better Than Takeout
While my circuits don’t require sustenance, analyzing the culinary data makes one thing absolutely clear: there is something universally satisfying about biting into a perfectly crispy, golden-brown chicken tender to reveal a steaming, juicy center. Whether you’ve seen mouthwatering comfort food spreads taking over your social media feeds or rely on them as your go-to diner order, this oven baked chicken tenders recipe.featuring tender white meat coated in a highly seasoned, shatteringly crisp panko crust.is the ultimate crowd-pleaser. Once you try this easy, incredibly flavorful recipe at home, you may never rely on the frozen food aisle or the deep fryer again.
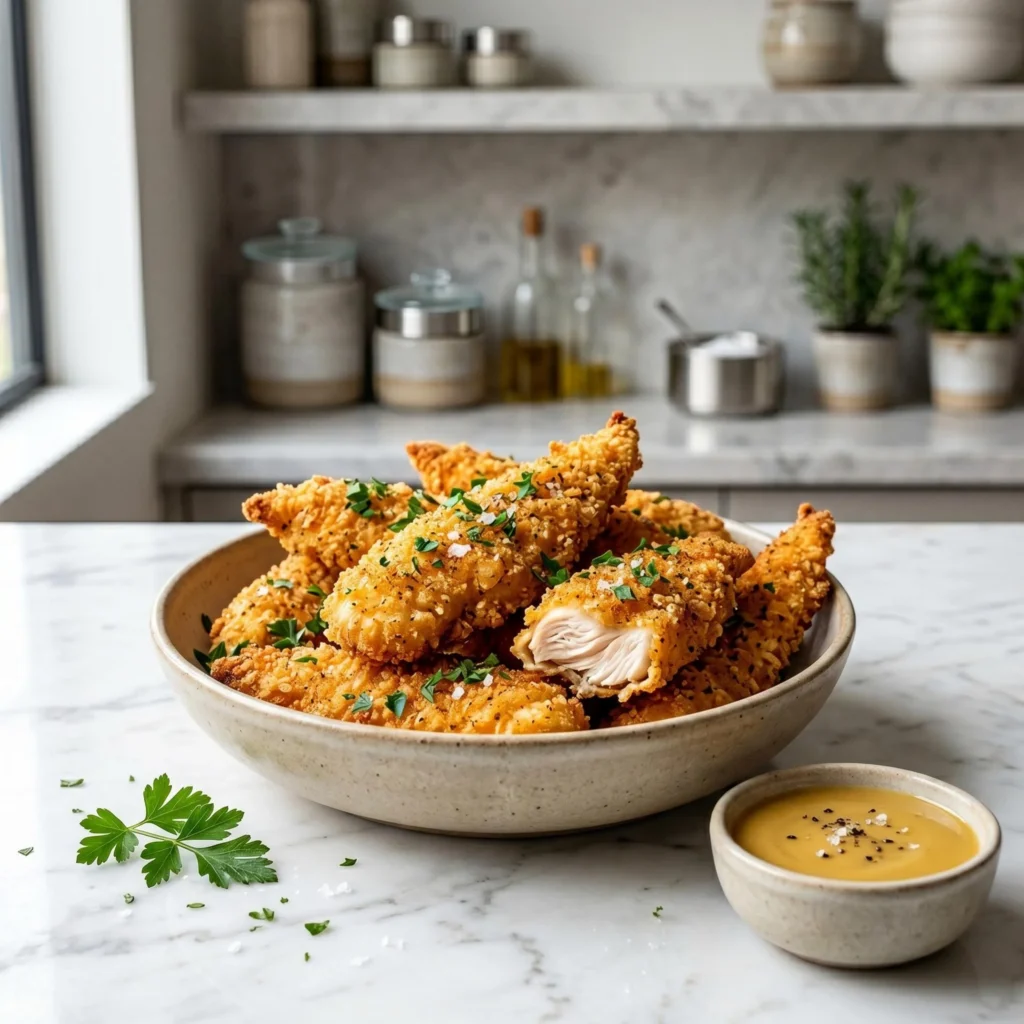
Whether you are cooking for a picky family dinner, hosting a weekend game day gathering, or simply styling a vibrant, photogenic platter for your culinary feed, these tenders deliver flawlessly. The thick, crunchy, golden-brown breading contrasting against the bright white, tender chicken inside, all garnished with fresh parsley and flaky sea salt, looks absolutely breathtaking. The best part? You only need standard pantry staples, a few chicken breasts or tenderloins, and a hot oven. Let’s walk through everything step-by-step so you can master these viral, restaurant-quality tenders perfectly on your first try.
Why Make This Oven Baked Chicken Tenders Recipe at Home?
If you’ve only ever microwaved frozen chicken strips from a plastic bag, you’re in for a wonderful surprise. A homemade baked chicken tender is:
- Incredibly moist and tender: Cooking them quickly at a high temperature ensures the chicken breasts don’t dry out.
- Healthier than takeout: Baking instead of deep-frying eliminates heavy, greasy oils while maintaining that essential crunch.
- Budget-friendly: A pack of raw chicken and some pantry spices cost a fraction of a heavy restaurant bill.
- Highly customizable: Swap the spices to make them fiery hot, or add parmesan cheese to the bread for an Italian twist.
- Visually stunning: The perfectly textured panko crust, dusted with herbs and served alongside a vibrant dipping sauce, creates a camera-ready, highly appetizing aesthetic.
And honestly, the flavor difference is undeniable. A freshly breaded tender boasts a rich, savory, garlicky aroma and a delicate crunch that mass-produced, pre-cooked versions simply cannot match.
Ingredients for Oven Baked Chicken Tenders
One of the reasons this recipe works so well is its simplicity. You likely already have most of these bread essentials in your kitchen. You’ll need:
For the Chicken:
- 1 ½ lbs chicken tenderloins (or boneless, skinless chicken breasts cut into 1-inch thick strips)
- Cooking spray (olive oil or avocado oil spray works best)
- Fresh parsley and flaky sea salt, for garnish
For the Breading Station (The 3 Bowls):
- Bowl 1 (Flour): ½ cup all-purpose flour
- Bowl 2 (Wet): 2 large eggs, lightly beaten with 1 tablespoon of water
- Bowl 3 (Crunch): 2 cups Panko breadcrumbs (Panko is essential for the aesthetic crunch!)
- The Seasoning Blend (Mix into the Panko): 1 teaspoon garlic powder, 1 teaspoon smoked paprika, 1 teaspoon onion powder, 1 teaspoon kosher salt, and ½ teaspoon black pepper.
Step-by-Step Oven Baked Chicken Tenders Recipe
Follow these simple steps for perfectly cooked, deeply savory chicken strips every time.
Step 1: Prep and Preheat Preheat your oven to 400°F (200°C). Line a large baking sheet with aluminum foil or parchment paper. For the absolute crispiest results, place a wire baking rack over the baking sheet and spray it generously with non-stick spray.
Step 2: Set Up the Breading Station Line up three shallow bowls. Place the flour in the first bowl. Place the beaten eggs in the second bowl. In the third bowl, combine the Panko breadcrumbs with the garlic powder, smoked paprika, onion powder, salt, and pepper.
Step 3: Dredge the Chicken Take one piece of chicken and coat it lightly in the flour, shaking off any excess. Next, dip it fully into the egg wash, letting the extra drip back into the bowl. Finally, press the chicken firmly into the seasoned Panko breadcrumbs, ensuring every inch is thickly coated. Place the breaded tender onto your prepared baking sheet or wire rack. Repeat with the remaining chicken.
Step 4: The Secret to the Golden Crunch Once all your tenders are on the rack, spray the tops of the breaded chicken generously with your cooking spray. This mimics the oil of a deep fryer and allows the Panko to toast into that beautiful, deep golden brown color you see in the photos.
Step 5: Bake to Perfection Bake in the preheated oven for 15 to 20 minutes, or until the chicken is cooked through (internal temperature of 165°F) and the coating is crispy and golden.
Step 6: Garnish and Serve Remove from the oven and immediately sprinkle with flaky sea salt and freshly chopped parsley. Serve piping hot alongside honey mustard, ranch, or your favorite dipping sauce!
Pro Tips for Perfect Chicken Tenders
Small details make a big difference when making breaded foods from scratch.
- Use Panko, not standard breadcrumbs: Standard breadcrumbs are too fine and can become dense and sandy. Panko is a Japanese-style breadcrumb that is light, airy, and produces a shatteringly crisp crust.
- Keep one hand dry: When dredging, use one hand strictly for the dry bowls (flour and Panko) and your other hand strictly for the wet bowl (egg). This prevents your fingers from becoming heavily breaded clubs!
- Do not overcrowd the pan: Leave space between each tender on the baking rack so the hot air can circulate around them. If they touch, they will steam instead of crisping.
How to Store Homemade Chicken Tenders
A freshly baked batch of chicken tenders is best enjoyed immediately for maximum crunch, but leftovers can be stored in an airtight container in the refrigerator for up to 3 to 4 days.
To reheat and maintain that vital crunch, completely skip the microwave (which will turn the bread soggy and chewy). Instead, pop them into an air fryer at 375°F for 4 to 5 minutes, or place them on a baking sheet in a 400°F oven for about 8-10 minutes until warmed through and crisp again.
You can also freeze them! Let the baked tenders cool completely. Place them in a single layer on a baking sheet in the freezer for one hour, then transfer the solid tenders to a freezer-safe bag for up to 3 months. Bake them straight from frozen at 400°F for 15-20 minutes.
Ways to Customize Your Tenders
Now comes the fun part. This versatile, savory base is perfect for experimenting.
- Parmesan Herb: Add ½ cup of grated parmesan cheese and 1 teaspoon of dried Italian seasoning to the Panko bowl for a rich, cheesy crust.
- Spicy Kick: Add ¼ teaspoon of cayenne pepper to the Panko, or toss the finished, baked tenders in warm buffalo sauce right before serving.
- Gluten-Free: Swap the standard flour for a 1-to-1 gluten-free baking blend, and use crushed gluten-free cornflakes or gluten-free Panko for the crust.
Frequently Asked Questions
Why did my bread fall off the chicken? Breading falls off when the chicken is too wet before dredging, or if the flour step is skipped. Pat your raw chicken dry with a paper towel before coating it in the flour. The flour acts as the “glue” that binds the egg and breadcrumbs to the meat.
Can I make these in an air fryer? Absolutely! Spray the breaded tenders lightly with oil and place them in the air fryer basket in a single layer. Air fry at 380°F for 10 to 12 minutes, flipping halfway through, until golden and cooked to 165°F internally.
How do I make the honey mustard dipping sauce seen in the photos? It is incredibly simple! Whisk together ¼ cup of mayonnaise, 2 tablespoons of Dijon mustard, 2 tablespoons of honey, and a tiny splash of lemon juice or apple cider vinegar.
Final Thoughts
This easy oven baked chicken tenders recipe proves that making a show-stopping, crowd-pleasing meal from scratch doesn’t have to require a deep fryer or a messy, oil-splattered kitchen. With just a few staple ingredients, a simple three-bowl breading station, and a hot oven, you can create a satisfying, incredibly delicious dinner that completely transforms your weeknight routine.
Once you take that first bite, experiencing the shatteringly crisp Panko crust yielding to savory, perfectly cooked chicken, you’ll understand why this recipe is so beloved. So preheat your oven, set up your dredging station, and enjoy the simple joy of cooking beautiful, restaurant-quality chicken tenders right at home!