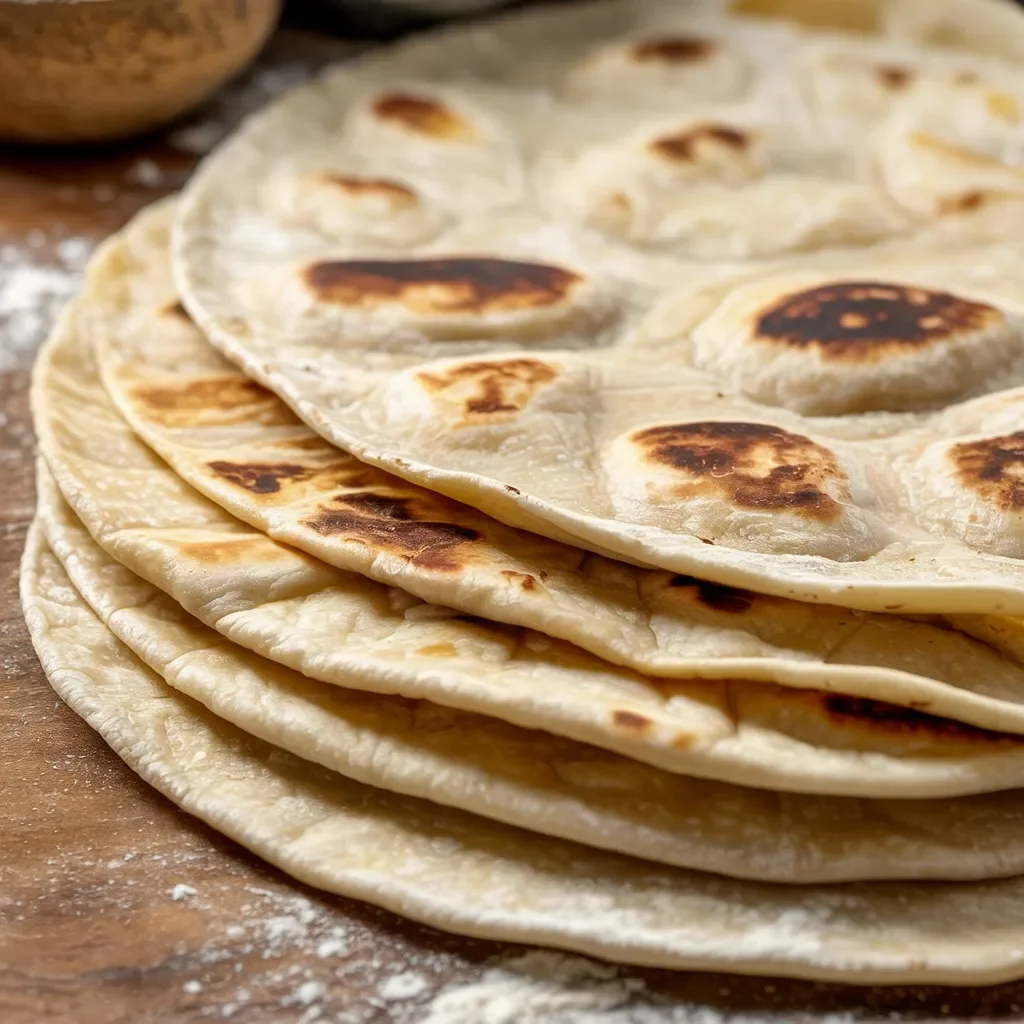
Easy Flour Tortilla Recipe
Nothing beats the homemade taste of fresh, soft flour tortillas. Whether you’re making them to wrap up your favorite fillings for tacos, fajitas, or simply to enjoy with a little butter, this easy flour tortilla recipe is perfect for any occasion. In this guide, we’ll walk you through everything you need to make soft, fluffy tortillas right at home – no special equipment required!
Why Make Your Own Flour Tortillas?
Flour tortillas are a pantry staple in many kitchens, but making them from scratch takes them to the next level. They are not only fresher than store-bought tortillas, but they’re also customizable! You can make them as thick or thin as you like, and the flavor is unmatched. Homemade tortillas can be served with a variety of dishes, such as tacos, wraps, burritos, or even as a side for soups and salads.
The beauty of homemade tortillas lies in their simplicity. Unlike store-bought tortillas that may contain preservatives or additives, when you make them at home, you know exactly what’s going in. And with just a few ingredients, you can whip up a batch of these tortillas in no time. They are perfect for any occasion, from family dinners to casual gatherings or even a quick snack.
Plus, making flour tortillas from scratch gives you complete control over the ingredients, ensuring they are free from preservatives and additives. This recipe is quick, easy, and can be made with basic pantry ingredients that you probably already have on hand.
Ingredients You’ll Need
To make these easy flour tortillas, you will need the following simple ingredients:
- 2 cups all-purpose flour
- 1/2 teaspoon salt
- 2 tablespoons vegetable oil or melted butter
- 3/4 cup warm water (more if needed)
- 1/2 teaspoon baking powder (optional for extra fluffiness)
These ingredients are all you need to get started. You can easily double or halve the recipe depending on how many tortillas you need.
Step-by-Step Instructions
1. Combine Dry Ingredients
Start by mixing the dry ingredients together in a large bowl. In this case, that’s the flour, salt, and optional baking powder. Use a whisk or a fork to mix everything evenly, ensuring there are no lumps. This step is essential to ensure the baking powder (if using) and salt are evenly distributed throughout the flour.
2. Add Wet Ingredients
Next, add the oil or melted butter to the dry mixture. Use your fingers or a pastry cutter to combine the oil with the flour. The mixture should look crumbly but slightly moist. Now, slowly pour in the warm water, stirring as you go. Continue adding water until the dough comes together in a ball. You may need a little extra water if the dough feels too dry. The goal is to have a soft and slightly sticky dough.
3. Knead the Dough
Once the dough is formed, transfer it to a clean, lightly floured surface. Knead the dough for about 5-7 minutes until it becomes smooth and elastic. Kneading activates the gluten in the flour, which will give the tortillas their soft texture. If the dough feels too sticky, sprinkle in a little more flour; if it’s too dry, add a bit more water. When you’re done kneading, cover the dough with a damp cloth or plastic wrap, and let it rest for about 30 minutes. This allows the gluten to relax, making it easier to roll out.
4. Divide the Dough
After the dough has rested, divide it into 8 equal portions (for medium-sized tortillas). Roll each portion into a ball and let them rest for an additional 10 minutes. This short resting time helps the dough relax further, making it easier to roll out without tearing.
5. Roll the Dough
Now it’s time to roll out your tortillas! On a lightly floured surface, take each ball of dough and roll it out with a rolling pin. Aim for about a 6-8 inch circle, but don’t worry about making them perfect – rustic edges are part of the charm! If the dough sticks, sprinkle a little more flour on top or on the surface. The key to soft tortillas is rolling them out evenly, so take your time. If you prefer thinner tortillas, roll them out a little thinner; for thicker ones, simply roll them a bit thicker.
6. Cook the Tortillas
Heat a large, dry skillet or griddle over medium-high heat. Once it’s hot, place a tortilla on the skillet and cook it for about 30 seconds or until you see bubbles start to form. Flip the tortilla and cook the other side for another 30 seconds, or until golden brown. The high heat ensures the tortillas puff up slightly, giving them that soft, airy texture. If your skillet is too hot, you may need to adjust the heat slightly to avoid burning the tortillas. You want them golden, not charred.
7. Keep the Tortillas Warm
As you cook each tortilla, place it on a clean towel and cover it to keep it warm and soft. This also prevents them from drying out. If you’re making a large batch, you can also place them in a covered container or wrap them in foil to keep them warm until you’re ready to serve.
8. Serve and Enjoy!
Now that your tortillas are ready, you can use them in a variety of dishes. Fill them with your favorite meats, veggies, or even a simple combination of beans and cheese. They are the perfect base for tacos, burritos, fajitas, and wraps. You can also enjoy them as a side to soups or as a quick snack with a bit of butter or garlic.
Tips for Perfect Flour Tortillas
- Rest the Dough: Don’t skip the resting time. It’s essential for making the dough easier to roll and for achieving soft, pliable tortillas. The resting time is also important for the dough to fully hydrate, which makes the tortillas more tender.
- Use Warm Water: Warm water helps the dough come together more easily and ensures that the tortillas are soft and chewy. The warm water also helps the butter or oil incorporate better into the dough.
- Cook Over Medium Heat: A hot skillet is crucial for creating those perfect bubbles, but make sure your heat isn’t too high, or you may end up with burnt tortillas. Cooking them on medium heat ensures they cook evenly and maintain a golden brown color.
- Add Flavor: You can easily customize these tortillas by adding herbs and spices to the dough, such as garlic powder, cumin, or chili powder for a little extra flavor. You can even add a pinch of cayenne pepper for a spicy kick.
How to Store Homemade Tortillas
If you have leftovers (though I doubt it!), store the tortillas in an airtight container or wrap them in a clean kitchen towel. They can be kept at room temperature for about 2-3 days. For longer storage, you can freeze them by wrapping each tortilla in plastic wrap and placing them in a freezer bag. When you’re ready to eat, just heat them up in a skillet or microwave.
For best results, reheat the tortillas in a dry skillet to retain their soft texture. You can also wrap them in a damp towel and microwave them for 10-15 seconds to make them warm and pliable.
Why Homemade Tortillas Are Worth It
Making tortillas at home may seem like a lot of work, but the results are definitely worth it. Fresh flour tortillas are incredibly versatile, easy to make, and so much better than anything you can buy at the store. The flavor and texture of freshly made tortillas cannot be matched by store-bought versions. Whether you’re serving them with a simple meal or using them as the base for a fancy taco night, these homemade tortillas are sure to impress.
Plus, with this simple recipe, you’ll have soft, fluffy tortillas in no time. The process is quick, and the result is a much tastier and healthier alternative to the store-bought options. Homemade tortillas are perfect for impressing your guests, or just for enjoying a comforting meal at home.
So, next time you’re craving tacos, burritos, or any dish that needs a flour tortilla, skip the store-bought ones and give this easy flour tortilla recipe a try. You’ll be amazed at how much better they taste and how simple it is to make them yourself!