Ladybug Cupcakes Recipe
Cute, Fun, and Perfect for Kids Parties
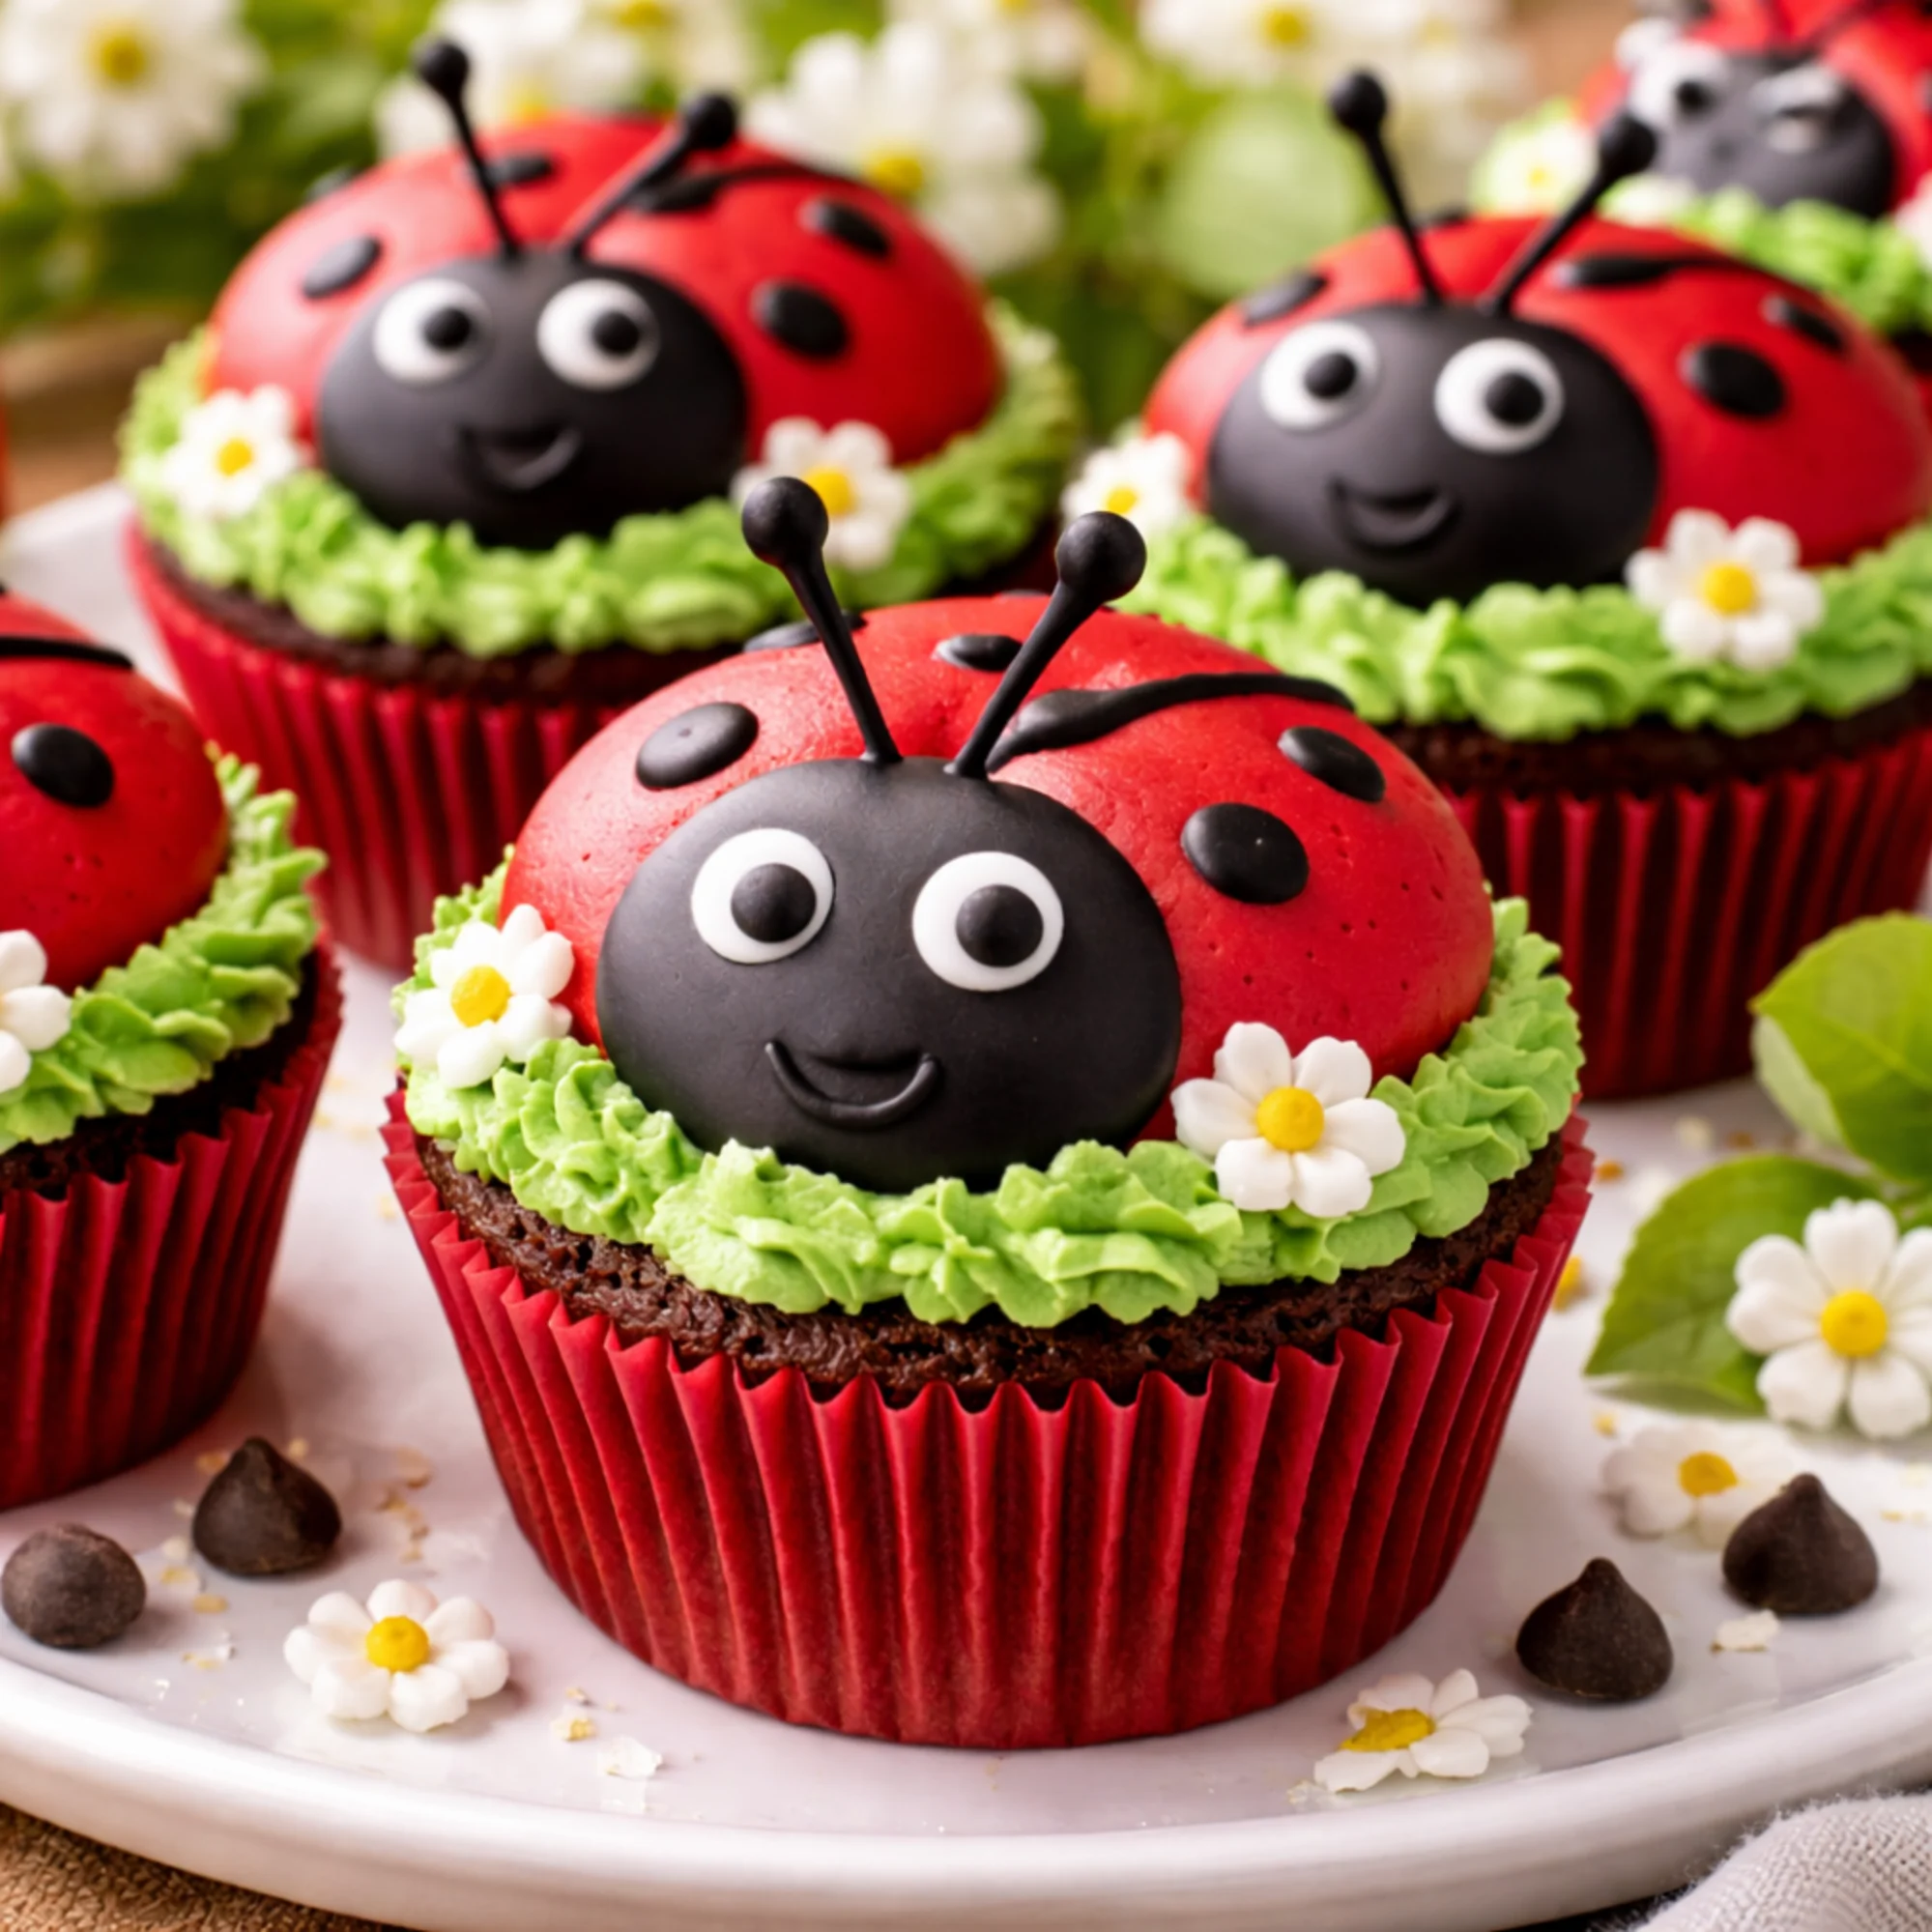
There’s something incredibly delightful about desserts that are both adorable and delicious. Ladybug cupcakes are one of those treats that instantly bring smiles to the table. With their bright red frosting, playful black spots, and sweet little faces, these cupcakes look like tiny edible ladybugs sitting on top of fluffy chocolate cake.
Whether you’re planning a birthday party, a garden themed celebration, or simply want to make something fun with kids, this ladybug cupcakes recipe is a wonderful choice. They are surprisingly simple to decorate and require only a few basic baking ingredients and some creative touches.
The best part is that these cupcakes taste just as amazing as they look. Soft chocolate cupcakes paired with creamy frosting create a dessert that both kids and adults love. Let’s walk through everything step by step so you can make these charming ladybug cupcakes perfectly on your first try.
Why Make Ladybug Cupcakes at Home?

Store bought decorated cupcakes can be expensive and often lack the personal touch that homemade treats bring. Making ladybug cupcakes at home allows you to customize every detail while creating a fun baking experience.
Homemade ladybug cupcakes are:
Fresh and flavorful
Perfect for themed parties
Fun to decorate with kids
More affordable than bakery cupcakes
Completely customizable with colors and decorations
They also make a beautiful dessert table centerpiece for spring events, garden parties, or kids birthdays.
Ingredients for Ladybug Cupcakes
This recipe uses simple ingredients that are easy to find in most kitchens.
For the cupcakes you’ll need:
1 cup all purpose flour
1/2 cup cocoa powder
1 teaspoon baking powder
1/2 teaspoon baking soda
1/4 teaspoon salt
3/4 cup sugar
1/2 cup vegetable oil
2 large eggs
1 teaspoon vanilla extract
1/2 cup milk
For the decorations you’ll need:
Red buttercream frosting
Black fondant or chocolate icing
Candy eyes
Chocolate chips or black fondant dots
Green frosting for grass decoration
Small sugar flowers (optional)
These ingredients help create both the delicious cupcake base and the adorable ladybug design.
Step by Step Ladybug Cupcakes Recipe
Follow these simple steps to bake and decorate your cupcakes.
Step 1: Preheat the Oven
Preheat your oven to 350°F (175°C). Line a cupcake pan with red or white cupcake liners.
Step 2: Mix the Dry Ingredients
In a large bowl, combine the flour, cocoa powder, baking powder, baking soda, and salt. Stir until everything is evenly mixed.
Step 3: Mix the Wet Ingredients
In another bowl, whisk together the sugar, vegetable oil, eggs, vanilla extract, and milk until the mixture becomes smooth and creamy.
Step 4: Combine the Batter
Gradually add the dry ingredients into the wet mixture while stirring gently. Mix until a smooth batter forms without lumps.
Step 5: Fill the Cupcake Liners
Pour the batter into the cupcake liners, filling each about two thirds full.
Bake for 18 to 20 minutes or until a toothpick inserted in the center comes out clean.
Allow the cupcakes to cool completely before decorating.
Step 6: Frost the Cupcakes
Spread or pipe green frosting around the edge of each cupcake to create a grass effect.
Then add a smooth dome of red frosting on top to form the ladybug body.
Step 7: Create the Ladybug Face
Place a small piece of black fondant or chocolate frosting at the front of the cupcake to form the ladybug head.
Add candy eyes and a small smile using chocolate icing.
Step 8: Add the Spots and Antennae
Use chocolate chips or small fondant circles to create the black spots on the red frosting.
Insert thin chocolate sticks or fondant pieces to form the antennae.
Your adorable ladybug cupcakes are now ready to serve.
Pro Tips for Perfect Ladybug Cupcakes
Small decorating tricks can make your cupcakes look even more charming.
Use bright red frosting for a vibrant ladybug shell
Smooth the frosting dome for a clean ladybug shape
Use mini chocolate chips for perfectly sized spots
Pipe green frosting using a grass tip for realistic texture
Chill cupcakes briefly before decorating to keep frosting firm
These little details help bring the ladybug design to life.
Fun Decoration Variations
Once you master the basic design, you can add your own creative touches.
Try these ideas:
Add edible flowers around the cupcakes for a garden theme
Use strawberry flavored frosting for a fruity twist
Decorate cupcakes with tiny fondant leaves
Create different ladybug expressions with icing
These variations make your dessert table even more colorful and fun.
How to Store Ladybug Cupcakes
These cupcakes can be stored easily if you make them ahead of time.
Room temperature: Store in an airtight container for up to 2 days.
Refrigerator: Store for up to 4 days if the frosting contains dairy.
Before serving, let refrigerated cupcakes sit at room temperature for about 15 minutes for the best texture.
When to Serve Ladybug Cupcakes
These cupcakes are perfect for many occasions.
Children’s birthday parties
Spring celebrations
Garden themed parties
School bake sales
Family baking activities
Their cheerful appearance makes them a favorite treat for kids.
Frequently Asked Questions
Can I use vanilla cupcakes instead of chocolate?
Yes. Vanilla cupcakes work perfectly and allow the red frosting to stand out even more.
Can I make these cupcakes ahead of time?
Absolutely. Bake the cupcakes a day in advance and decorate them the day of your event for the freshest look.
What can I use instead of fondant?
You can use chocolate frosting or melted chocolate to create the ladybug head and spots.
Final Thoughts
This ladybug cupcakes recipe shows that baking can be both creative and delicious. With simple ingredients and a few decorating tricks, you can transform ordinary cupcakes into charming little ladybugs that everyone will love.
Soft chocolate cupcakes, colorful frosting, and playful decorations come together to create a dessert that’s perfect for celebrations or just a fun afternoon baking project.
So gather your ingredients, preheat the oven, and enjoy the joy of creating these adorable ladybug cupcakes. And when you serve them, don’t be surprised if they become the highlight of the entire dessert table.