Amish Friendship Bread Recipe: A Heartwarming Tradition
Introduction: More Than Just a Recipe
There are few things more comforting than the scent of freshly baked bread wafting through your kitchen. Amish Friendship Bread isn’t just about baking; it’s a tradition, a deliciously sweet, cinnamon-spiced loaf made from a starter passed between friends and family. This recipe has been cherished for generations, not only because it yields a moist, flavorful loaf but also because of the spirit of sharing it embodies.
If you’ve ever had a neighbor or friend give you a portion of Amish Friendship Bread starter, you know that it’s more than just a recipe—it’s an invitation to be part of something special. The bread itself is moist, soft, and slightly tangy from the fermented starter, with a golden-brown topping of cinnamon and sugar that’s both irresistible and comforting.
In this article, we’ll take you through every step of creating your own Amish Friendship Bread from start to finish. You’ll learn how to make the starter, feed it, bake the bread, and of course, share the love with friends and family. Let’s dive into this sweet and heartwarming tradition!
What Makes Amish Friendship Bread So Special?
A Tradition of Sharing
One of the most beautiful aspects of Amish Friendship Bread is the tradition of passing the starter along to others. It’s not just about the bread—it’s about the connection it creates. The bread starts with a simple starter of flour, sugar, milk, and yeast, and over a 10-day period, you’ll nurture it, feeding it with more ingredients, and eventually passing on a portion to friends, so they can bake their own loaves. This tradition has been around for generations and is passed along with love, care, and the joy of giving.
The process of passing along the starter has become a way for communities to bond, sharing a piece of something homemade. The recipe itself reminds us that the simple act of baking and sharing with others can brighten someone’s day and strengthen connections. It’s a special recipe that goes beyond the ingredients—it’s about spreading kindness.
The Flavor Profile: Sweet, Spicy, and Comforting
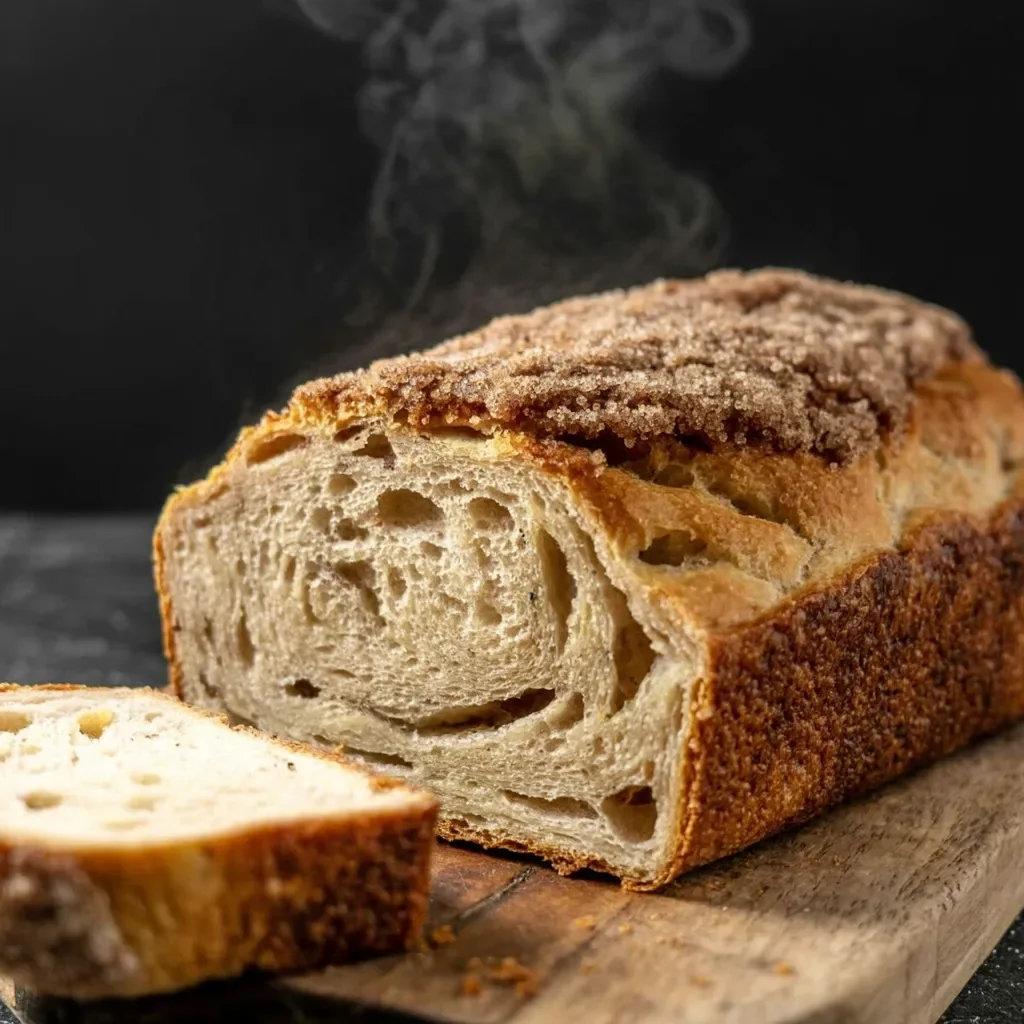
Amish Friendship Bread is a delightful cinnamon-sugar quick bread that’s full of flavor. The cake itself is slightly sweet, with a soft and moist crumb. The cinnamon-sugar topping adds a crispy, caramelized crust, giving the bread a perfect balance of textures. The bread is slightly tangy due to the fermentation of the starter, giving it a unique flavor that sets it apart from regular cake or bread recipes. It’s a comforting treat that makes for a perfect breakfast, snack, or dessert.
The Simplicity of Ingredients
Despite its rich flavor, Amish Friendship Bread requires minimal ingredients. The key components are flour, sugar, milk, and yeast for the starter, while the bread itself is made with basic pantry ingredients. The simplicity of the ingredients is one of the reasons why this recipe has stood the test of time—it’s a recipe that anyone can make with ingredients that are always readily available.
Ingredients for Amish Friendship Bread
For the Starter (Day 1):
- 1 cup all-purpose flour
- 1 cup granulated sugar
- 1 cup milk
- 1 packet (2 1/4 teaspoons) active dry yeast
- 1 cup warm water (105-115°F, not too hot)
For the Bread (Once Starter is Ready):
- 1 cup starter (from the previous batch)
- 1 cup all-purpose flour
- 1 cup granulated sugar
- 1/2 cup vegetable oil (you can also use melted butter for a richer flavor)
- 1/2 cup milk
- 2 large eggs
- 1 teaspoon vanilla extract
- 1 1/2 teaspoons baking powder
- 1/2 teaspoon baking soda
- 1/2 teaspoon salt
- 1/2 cup granulated sugar (for topping)
- 1 teaspoon ground cinnamon (for topping)
How to Make Amish Friendship Bread
Step 1: Prepare the Starter (Day 1)
Making Amish Friendship Bread starts with the starter. In a medium-sized bowl, dissolve the yeast in warm water (about 105°F-115°F) and let it sit for 5-10 minutes. The yeast should start to bubble and foam, which indicates it’s activated. Once activated, stir in the flour, sugar, and milk. Cover the bowl loosely with plastic wrap or a kitchen towel, and let it sit at room temperature for 5 days. You’ll need to stir the starter once a day, but do not cover it tightly—allowing air to circulate is crucial for the fermentation process.
Step 2: Feed the Starter (Day 6 to Day 10)
On Day 6, you will need to “feed” the starter. Add 1 cup of flour, 1 cup of sugar, and 1 cup of milk to the mixture, stirring well. This process nourishes the yeast, encouraging it to grow and ferment, which is why it’s important to keep it at room temperature during these 10 days. Stir the starter every day, and be sure to feed it again on Day 10.
By Day 10, your starter should be bubbly and ready for use! At this point, you’ll reserve 1 cup of starter for your bread and share the remaining starter with friends and family, along with instructions on how to continue the process.
Step 3: Prepare the Bread Batter
Now that your starter is ready, you can make the bread. Preheat your oven to 350°F (175°C) and grease a 9×5-inch loaf pan. In a large bowl, combine the starter, flour, sugar, oil, milk, eggs, and vanilla extract. Mix until smooth.
In a separate small bowl, whisk together the baking powder, baking soda, and salt. Gradually add these dry ingredients to the wet ingredients, stirring until everything is just combined. Be careful not to overmix the batter—this will help the bread stay soft and tender.
Step 4: Prepare the Cinnamon-Sugar Topping
For the cinnamon-sugar topping, mix together the cinnamon and sugar in a small bowl. This mixture will create a sweet, crispy crust on top of your bread as it bakes.
Step 5: Bake the Bread
Pour the batter into the prepared loaf pan, spreading it evenly with a spatula. Sprinkle the cinnamon-sugar mixture generously over the top of the batter. Bake in the preheated oven for 50-60 minutes, or until the top is golden brown and a toothpick inserted into the center of the bread comes out clean. The baking time may vary slightly depending on your oven, so keep an eye on the bread as it bakes.
Step 6: Cool and Serve
Let the bread cool in the pan for about 10 minutes before transferring it to a wire rack to cool completely. Once the bread is fully cooled, slice it and enjoy the fruits of your labor! The bread will be soft, moist, and slightly tangy from the starter, with a rich cinnamon-sugar topping that creates a caramelized, crunchy crust.
Tips for Perfect Amish Friendship Bread
1. Don’t Rush the Starter
The starter is the key to the bread’s flavor. Make sure you give it the full 10 days to develop. It’s tempting to skip steps, but allowing the yeast to ferment properly is what gives the bread its unique flavor and texture.
2. Use Plastic or Glass Containers
Avoid using metal containers for the starter, as they can react with the yeast. Always use plastic or glass bowls and containers to keep the starter safe and active.
3. Be Gentle with Mixing
When mixing the bread batter, be gentle. Overmixing can lead to a dense, heavy loaf. Stir just until the ingredients are incorporated for a light, airy texture.
4. Add Nuts or Chocolate Chips
Feel free to experiment with the recipe by adding nuts, raisins, or even chocolate chips to the batter for added flavor and texture. You can also try adding a dash of nutmeg or allspice to the cinnamon-sugar topping for a unique twist.
Serving and Storing Amish Friendship Bread
Serving Suggestions:
Amish Friendship Bread is best served fresh, but it also makes an excellent snack or dessert with a cup of coffee or tea. Serve it warm, topped with butter, or enjoy it as is for a lighter treat. It’s perfect for breakfast or a sweet afternoon snack.
Storing Leftovers:
Store your Amish Friendship Bread in an airtight container at room temperature for up to 3 days. You can also freeze the bread by slicing it and wrapping the slices in plastic wrap, placing them in a freezer bag, and storing them for up to 3 months. To serve, simply thaw at room temperature or microwave individual slices for a few seconds.
Conclusion: Share the Joy of Amish Friendship Bread
Amish Friendship Bread is more than just a delicious loaf—it’s a recipe that connects people. The process of making the starter, nurturing it, and passing it along to friends and family is what makes this bread so special. Whether you’re baking for yourself or sharing it with loved ones, Amish Friendship Bread is a heartwarming treat that will bring smiles to everyone’s face. Try this recipe today and start your own tradition of sharing and baking!