Oreo Pops Recipe How to Make
Sweet, creamy, chocolatey, and fun to serve, Oreo pops are one of the easiest no bake treats you can make at home. They are made with crushed Oreo cookies, cream cheese, melted chocolate, and lollipop sticks. The inside is soft and rich like a truffle, while the outside has a smooth chocolate coating that makes every bite delicious.
Oreo pops are perfect for birthday parties, baby showers, holiday dessert tables, school treats, or simple weekend snacks. They look beautiful on a plate and feel special, but the recipe is very simple. You do not need baking skills, an oven, or complicated ingredients. With just a few steps, you can turn regular Oreo cookies into cute dessert pops that everyone will love.
The best part is that you can decorate them in many ways. You can dip them in white chocolate, milk chocolate, dark chocolate, or coloured candy melts. Add chocolate drizzle, sprinkles, crushed cookies, or nuts to match any party theme.
Why You’ll Love This Oreo Pops Recipe
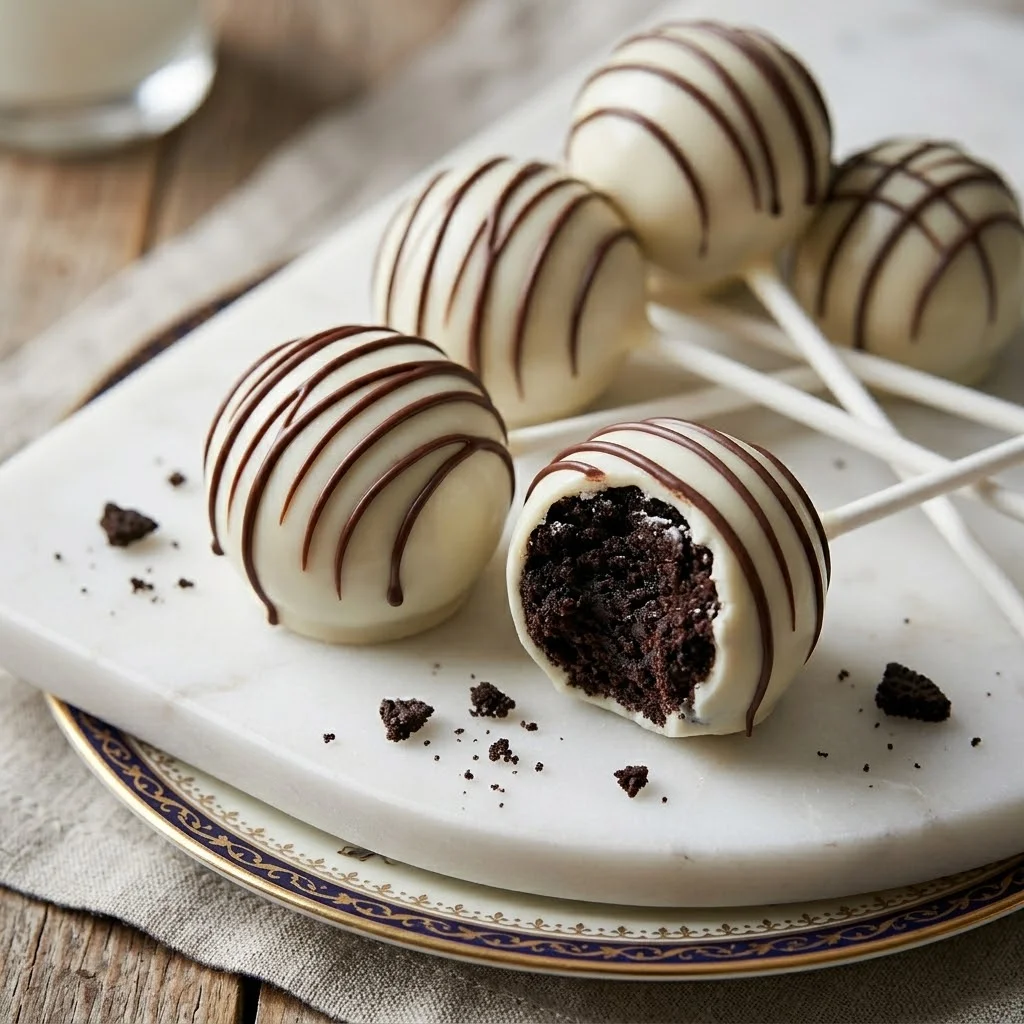
Oreo pops are easy, quick, and beginner friendly. Since this is a no bake recipe, it is great for anyone who wants a simple dessert without spending too much time in the kitchen.
You’ll love this recipe because it uses simple ingredients, looks beautiful when finished, and can be made ahead of time. The creamy Oreo filling tastes rich and soft, while the chocolate shell gives a smooth and sweet bite.
This recipe is also very flexible. You can make classic Oreo pops with white chocolate, use milk chocolate for a richer taste, or decorate them with colourful sprinkles for parties. They are easy to hold, easy to serve, and perfect for both kids and adults.
Ingredients for Oreo Pops
You’ll need:
24 Oreo cookies
4 ounces cream cheese, softened
2 cups white chocolate chips or candy melts
1/2 cup milk chocolate or dark chocolate, for drizzle
Lollipop sticks
Sprinkles or crushed Oreos, optional
1 teaspoon coconut oil or shortening, optional for smoother chocolate
These ingredients make soft, rich Oreo pops with a smooth coating. Cream cheese helps bind the cookie crumbs and gives the inside a creamy texture. Candy melts are easier to work with, but chocolate chips also work well if melted carefully.
Best Oreos to Use
Classic Oreo cookies work best for this recipe because they have the right balance of cookie and cream filling. You can also use double stuffed Oreos, but the mixture may become softer because of the extra cream.
If you want to try different flavours, you can use golden Oreos, mint Oreos, peanut butter Oreos, or birthday cake Oreos. Each flavour will give the pops a different taste and look.
For a classic chocolate cookie centre, regular Oreos are the best choice.
Step by Step Oreo Pops Recipe
Step 1: Crush the Oreos
Place the Oreo cookies in a food processor and blend until they turn into fine crumbs. The crumbs should be small and even so the filling becomes smooth.
If you do not have a food processor, place the cookies in a zip top bag and crush them with a rolling pin. Make sure there are no large pieces left.
The finer the crumbs, the smoother your Oreo pops will be.
Step 2: Mix with Cream Cheese
Add the softened cream cheese to the Oreo crumbs. Mix until everything comes together into a soft dough like mixture.
You can use a spoon, spatula, or clean hands for mixing. The mixture should hold together when pressed. If it feels too dry, mix a little longer because the cream cheese needs time to blend with the cookie crumbs.
The filling should be soft, thick, and easy to shape.
Step 3: Shape the Oreo Balls
Take small portions of the mixture and roll them into smooth balls. Try to keep them equal in size so they look neat and professional.
Place the Oreo balls on a tray lined with parchment paper. If you want round pops, roll them gently between your palms. If you want a flatter cake pop style, press them slightly.
Once all the balls are shaped, place the tray in the refrigerator for about 20 to 30 minutes. This helps them firm up before adding the sticks.
Step 4: Add the Lollipop Sticks
Melt a small amount of chocolate or candy melts. Dip the end of each lollipop stick into the melted chocolate, then gently push it halfway into each Oreo ball.
This small step helps the stick stay in place and prevents the Oreo pop from falling apart while dipping.
After inserting the sticks, chill the pops again for 10 to 15 minutes so the chocolate around the stick can set.
Step 5: Melt the Chocolate Coating
Add white chocolate chips or candy melts to a microwave safe bowl. Heat in short intervals, stirring after each one, until smooth and fully melted.
If the chocolate feels too thick, add a small amount of coconut oil or shortening and stir well. This makes the coating smoother and easier to dip.
Do not overheat the chocolate because it can become thick or grainy. Melt it slowly and stir often.
Step 6: Dip the Oreo Pops
Hold each Oreo pop by the stick and dip it into the melted chocolate. Turn it gently until the ball is fully coated.
Lift it out and let the extra chocolate drip back into the bowl. You can gently tap the stick on the edge of the bowl to remove excess coating.
Place the coated Oreo pop back on the parchment paper, or stand it upright in a foam block if you want a rounder shape.
Step 7: Decorate the Pops
Before the coating fully sets, add sprinkles, crushed Oreos, or small decorations if using.
If you want a chocolate drizzle, let the white chocolate coating set first. Then melt milk chocolate or dark chocolate and drizzle it over the pops using a spoon or piping bag.
The drizzle gives the Oreo pops a beautiful bakery style look.
Step 8: Chill and Serve
Place the finished Oreo pops in the refrigerator for about 20 minutes, or until the coating is firm.
Once set, they are ready to serve. Arrange them on a plate, wrap them individually for gifts, or stand them in a dessert display for parties.
Serve chilled or slightly cool for the best texture.
Tips for Perfect Oreo Pops
Use softened cream cheese so it mixes easily with the Oreo crumbs.
Chill the Oreo balls before dipping because warm or soft balls can fall apart in the chocolate.
Do not push the stick all the way through. Insert it only halfway so the pop stays secure.
Use a deep narrow cup for dipping. It makes coating the Oreo pops easier and cleaner.
Melt chocolate slowly to keep it smooth. High heat can make chocolate thick and difficult to use.
Let extra chocolate drip off before placing the pops down. This helps create a neat coating.
Decorate quickly if using sprinkles because they stick best while the coating is still wet.
Oreo Pop Decoration Ideas
Oreo pops can be decorated for almost any occasion.
For birthdays, use colourful sprinkles or birthday cake Oreos. For baby showers, use pink, blue, or pastel candy melts. For holidays, use red and green sprinkles, crushed peppermint, or themed decorations.
For a simple elegant look, dip them in white chocolate and drizzle thin lines of dark chocolate on top. You can also sprinkle crushed Oreo crumbs over the coating for extra texture.
If you want a more chocolatey version, dip them in milk chocolate and drizzle with white chocolate.
How to Store Oreo Pops
Store Oreo pops in an airtight container in the refrigerator for up to 5 days. Keep them chilled because the filling contains cream cheese.
If stacking them, place parchment paper between layers to protect the coating and decorations.
You can also wrap each pop individually in small treat bags if you are making them for parties or gifts.
Can You Freeze Oreo Pops?
Yes, Oreo pops can be frozen. Place them in a freezer safe container and freeze for up to 2 months.
To serve, move them to the refrigerator and let them thaw slowly. Avoid thawing them at room temperature for too long because condensation can affect the chocolate coating.
For the best look and texture, decorate them after thawing if you are making them far ahead.
Frequently Asked Questions
Can I make Oreo pops without cream cheese?
Yes, but cream cheese gives the best soft and creamy texture. You can use a little frosting instead, but the pops will be sweeter.
Why are my Oreo pops falling off the stick?
They may be too soft or the stick may not be secured properly. Chill the Oreo balls first, dip the stick in melted chocolate, insert it halfway, and chill again before dipping.
Can I use candy melts instead of chocolate?
Yes, candy melts are a great option because they melt smoothly and set nicely. They are also available in many colours.
Do Oreo pops need to be refrigerated?
Yes, because the filling contains cream cheese. Keep them refrigerated until ready to serve.
How far ahead can I make Oreo pops?
You can make them 1 to 2 days ahead for the freshest taste and best texture. They also store well for up to 5 days in the refrigerator.
Final Thoughts
Oreo pops are a simple, fun, and delicious no bake dessert that anyone can make at home. With crushed Oreos, cream cheese, melted chocolate, and lollipop sticks, you can create a sweet treat that looks beautiful and tastes rich in every bite.
They are perfect for parties, holidays, dessert tables, gifts, or quick homemade snacks. You can keep them classic with white chocolate and chocolate drizzle, or decorate them with sprinkles and colours to match any event.