Flat Cake Pops Recipe
Sweet, colourful, creamy, and fun to make, this flat cake pops recipe is a simple treat that looks beautiful for parties, birthdays, dessert tables, and special celebrations. Unlike traditional round cake pops, flat cake pops are shaped like small discs, dipped in melted chocolate or candy melts, and decorated with drizzles, sprinkles, nuts, or colourful toppings.
These cake pops are soft on the inside and smooth on the outside. The cake crumb mixture is mixed with frosting, shaped into flat rounds, chilled, placed on sticks, and coated with chocolate. They are easier to decorate than round cake pops because they sit flat and have more surface area for toppings.
The best part is that you can make them with any cake flavour you like. Vanilla, chocolate, red velvet, strawberry, lemon, funfetti, or even leftover cake all work beautifully. Once you learn the basic method, you can change the colours and decorations for any theme.
Why You’ll Love This Flat Cake Pops Recipe
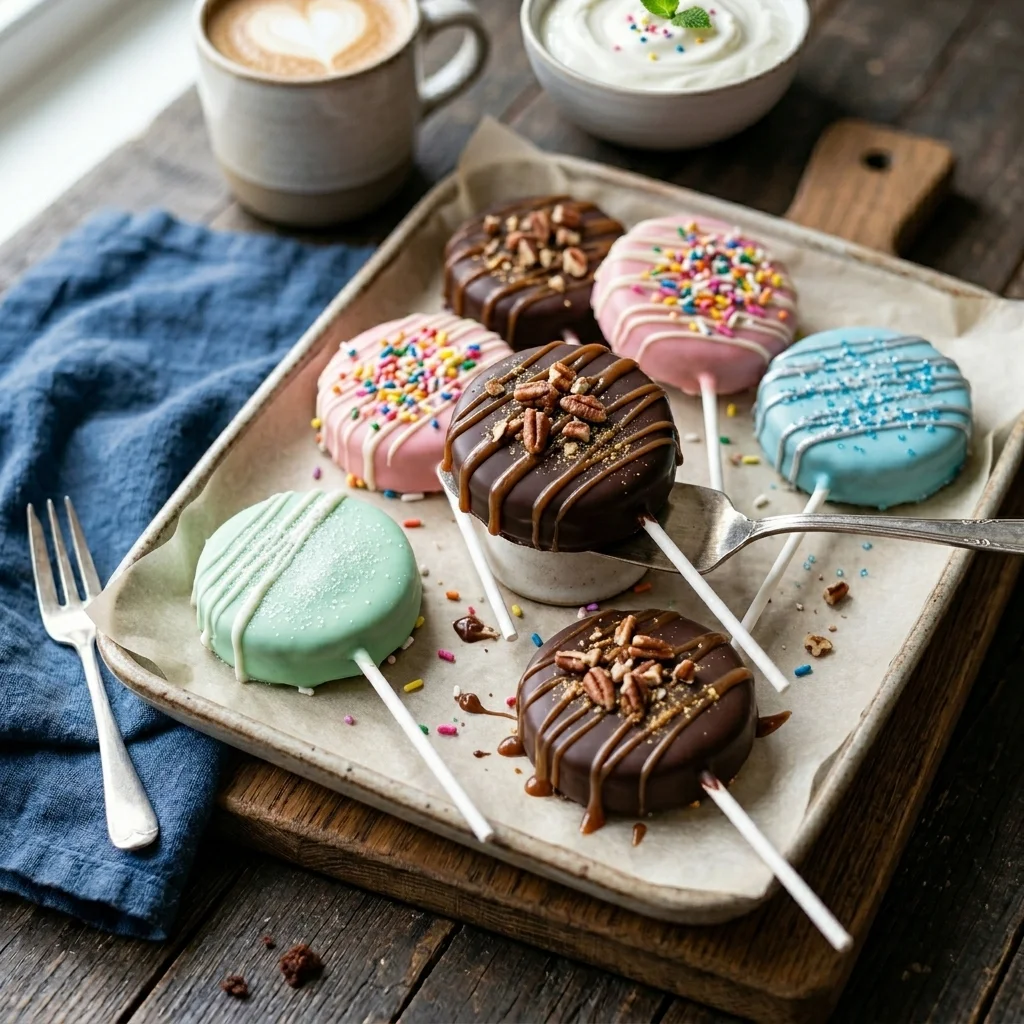
Flat cake pops are easy, pretty, and perfect for beginners. They look like bakery style treats, but the process is simple and fun.
You’ll love this recipe because it is no stress, easy to customize, and great for parties. Since the pops are flat, they are easier to dip, easier to decorate, and easier to display on a tray.
They are also great for kids’ birthdays, baby showers, holidays, wedding dessert tables, and homemade gifts. You can make them in pastel colours, chocolate colours, bright party colours, or elegant white and gold styles.
Ingredients for Flat Cake Pops
You’ll need:
1 baked cake, any flavour
1/3 to 1/2 cup frosting
2 cups candy melts or chocolate
1 teaspoon coconut oil or shortening, optional
Lollipop sticks
Sprinkles, chopped nuts, or crushed cookies
Extra melted chocolate for drizzle
You can use homemade cake or boxed cake mix. Both work well. The frosting helps bind the cake crumbs together so they can be shaped into flat discs.
Best Cake to Use
Any soft cake works for flat cake pops. Vanilla cake is perfect for colourful pops, chocolate cake gives a rich flavour, and red velvet cake looks beautiful inside when bitten.
You can also use leftover cake, cupcakes, or cake scraps. Just remove any hard edges before crumbling the cake so the mixture stays smooth.
If the cake is too moist, use less frosting. If the cake is dry, add a little more frosting until the mixture holds together.
Step by Step Flat Cake Pops Recipe
Step 1: Bake and Cool the Cake
Bake your cake according to the recipe or box instructions. Once baked, let it cool completely.
Do not use warm cake for cake pops. Warm cake can make the mixture too soft and difficult to shape.
Once cooled, remove any hard edges if needed.
Step 2: Crumble the Cake
Place the cake in a large bowl and crumble it with your hands or a fork. The crumbs should be fine and even.
Try not to leave large cake pieces in the bowl, because smooth crumbs create better shaped cake pops.
The texture should look like soft cake sand.
Step 3: Add Frosting
Add frosting a little at a time and mix it into the cake crumbs. Start with 1/3 cup and add more only if needed.
The mixture should hold together when pressed, but it should not feel too wet or sticky.
Too much frosting can make cake pops heavy and difficult to dip, so add slowly.
Step 4: Shape into Flat Discs
Take small portions of the cake mixture and roll them into balls first. Then gently flatten each ball into a round disc shape.
Make sure the discs are not too thin. They should be thick enough to hold the stick without breaking.
Place each flat cake pop on a parchment lined tray.
Step 5: Chill the Cake Pops
Place the tray in the refrigerator for 30 minutes or in the freezer for about 15 minutes.
Chilling helps the cake pops become firm, which makes dipping easier.
Do not freeze them too long, because very frozen cake pops can crack the chocolate coating after dipping.
Step 6: Add the Sticks
Melt a small amount of chocolate or candy melts. Dip the end of each lollipop stick into the melted coating, then gently insert it into the side or bottom of each flat cake pop.
This helps the stick stay secure inside the cake pop.
Place them back in the refrigerator for 10 minutes so the chocolate around the stick can set.
Step 7: Melt the Coating
Melt candy melts or chocolate in a microwave safe bowl. Heat in short intervals and stir after each one until smooth.
If the coating is too thick, add a small amount of coconut oil or shortening and mix well. This makes dipping easier and gives a smoother finish.
Use white, milk, dark, or colourful candy melts depending on your theme.
Step 8: Dip the Flat Cake Pops
Hold each cake pop by the stick and dip it into the melted coating. Make sure both sides and the edges are fully covered.
Lift it out gently and let the extra coating drip off. You can lightly tap the stick on the side of the bowl to remove excess chocolate.
Place the dipped cake pop on parchment paper to set.
Step 9: Decorate the Cake Pops
While the coating is still wet, add sprinkles, crushed cookies, chopped nuts, or sugar pearls.
For a drizzle effect, let the first coating set, then drizzle another colour of melted chocolate over the top.
You can make them simple and elegant or colourful and fun depending on the occasion.
Step 10: Chill and Serve
Place the decorated flat cake pops in the refrigerator for 15 to 20 minutes until fully set.
Once firm, they are ready to serve. Arrange them on a tray, wrap them in treat bags, or place them in a dessert display.
Tips for Perfect Flat Cake Pops
Let the cake cool completely before mixing.
Add frosting slowly so the mixture does not become too wet.
Chill the shaped pops before dipping.
Do not make the discs too thin, or they may break.
Dip the stick in chocolate before inserting it.
Use a deep bowl or cup for easier dipping.
Let extra chocolate drip off for a smooth finish.
Decorate quickly before the coating sets.
Decoration Ideas
Flat cake pops are easy to decorate in many beautiful ways.
For birthday parties, use colourful candy melts and rainbow sprinkles. For baby showers, use pastel pink, blue, mint, or yellow coatings. For a chocolate version, dip them in dark chocolate and drizzle with caramel or white chocolate.
You can also add crushed Oreos, chopped pecans, edible glitter, mini chocolate chips, or coconut flakes.
For a clean bakery style look, dip them in white chocolate and add thin chocolate drizzle lines on top.
Easy Flavour Variations
You can make this recipe with many different cake flavours.
For vanilla cake pops, use vanilla cake and vanilla frosting. For chocolate cake pops, use chocolate cake and chocolate frosting. For red velvet cake pops, use red velvet cake with cream cheese frosting.
For funfetti cake pops, use vanilla cake with sprinkles mixed into the batter. For lemon cake pops, use lemon cake and a light vanilla or lemon frosting.
Each flavour works with different coating colours and toppings.
How to Store Flat Cake Pops
Store flat cake pops in an airtight container in the refrigerator for up to 5 days.
Place parchment paper between layers if stacking them. This helps protect the coating and decorations.
Before serving, let them sit at room temperature for a few minutes so the inside becomes softer.
Can You Freeze Flat Cake Pops?
Yes, you can freeze flat cake pops before or after dipping.
To freeze before dipping, shape the cake pops and place them in a freezer safe container. Freeze for up to 2 months. Thaw slightly before adding sticks and dipping.
To freeze after dipping, wrap each cake pop carefully and store in a freezer safe container. Thaw in the refrigerator before serving.
For the best look, fresh dipped cake pops are always the prettiest.
Frequently Asked Questions
Why are my cake pops falling apart?
The mixture may be too dry, or the cake pops may not be chilled enough. Add a little more frosting and chill them before dipping.
Why did my chocolate coating crack?
The cake pops may have been too cold when dipped. Let them sit for a few minutes after removing from the freezer before coating.
Can I use boxed cake mix?
Yes, boxed cake mix works perfectly for flat cake pops. It is easy, quick, and gives a soft texture.
Can I make cake pops without sticks?
Yes, you can make flat cake bites instead. Shape them into discs, dip them in chocolate, and serve them without sticks.
What coating is best for cake pops?
Candy melts are easiest because they melt smoothly and set well. Chocolate chips can also work, but you may need to add a little coconut oil or shortening.
Final Thoughts
This flat cake pops recipe is simple, fun, and perfect for any celebration. With soft cake crumbs, creamy frosting, smooth chocolate coating, and colourful decorations, you can make beautiful treats that look impressive without being difficult.
They are great for birthdays, parties, holidays, baby showers, gifts, and dessert tables. The flat shape makes them easier to dip, decorate, and serve, especially for beginners.